Getting Started
The Complete Guide to Loger: Every Feature, How It Works, and How to Use It

The complete guide to Loger: every feature, how it works, and how to use it
Loger is ecommerce catalog infrastructure: it sits between messy supplier data and your live stores. You import raw files or folders, structure products with AI assistance, review them in a single catalog, optimize copy for SEO, sync prices and inventory when suppliers change, and publish to multiple platforms—without re-keying the same catalog in every admin panel.
This guide is written for operators who want one long reference: what each capability does under the hood, where to find it in the app, and how to use it safely. Plan limits and flags reflect the product configuration in the codebase (always confirm your own subscription in Settings → Billing).
How the app is organized (navigation map)
After you sign in, the main areas map roughly like this:
Area | Typical path | Purpose |
|---|---|---|
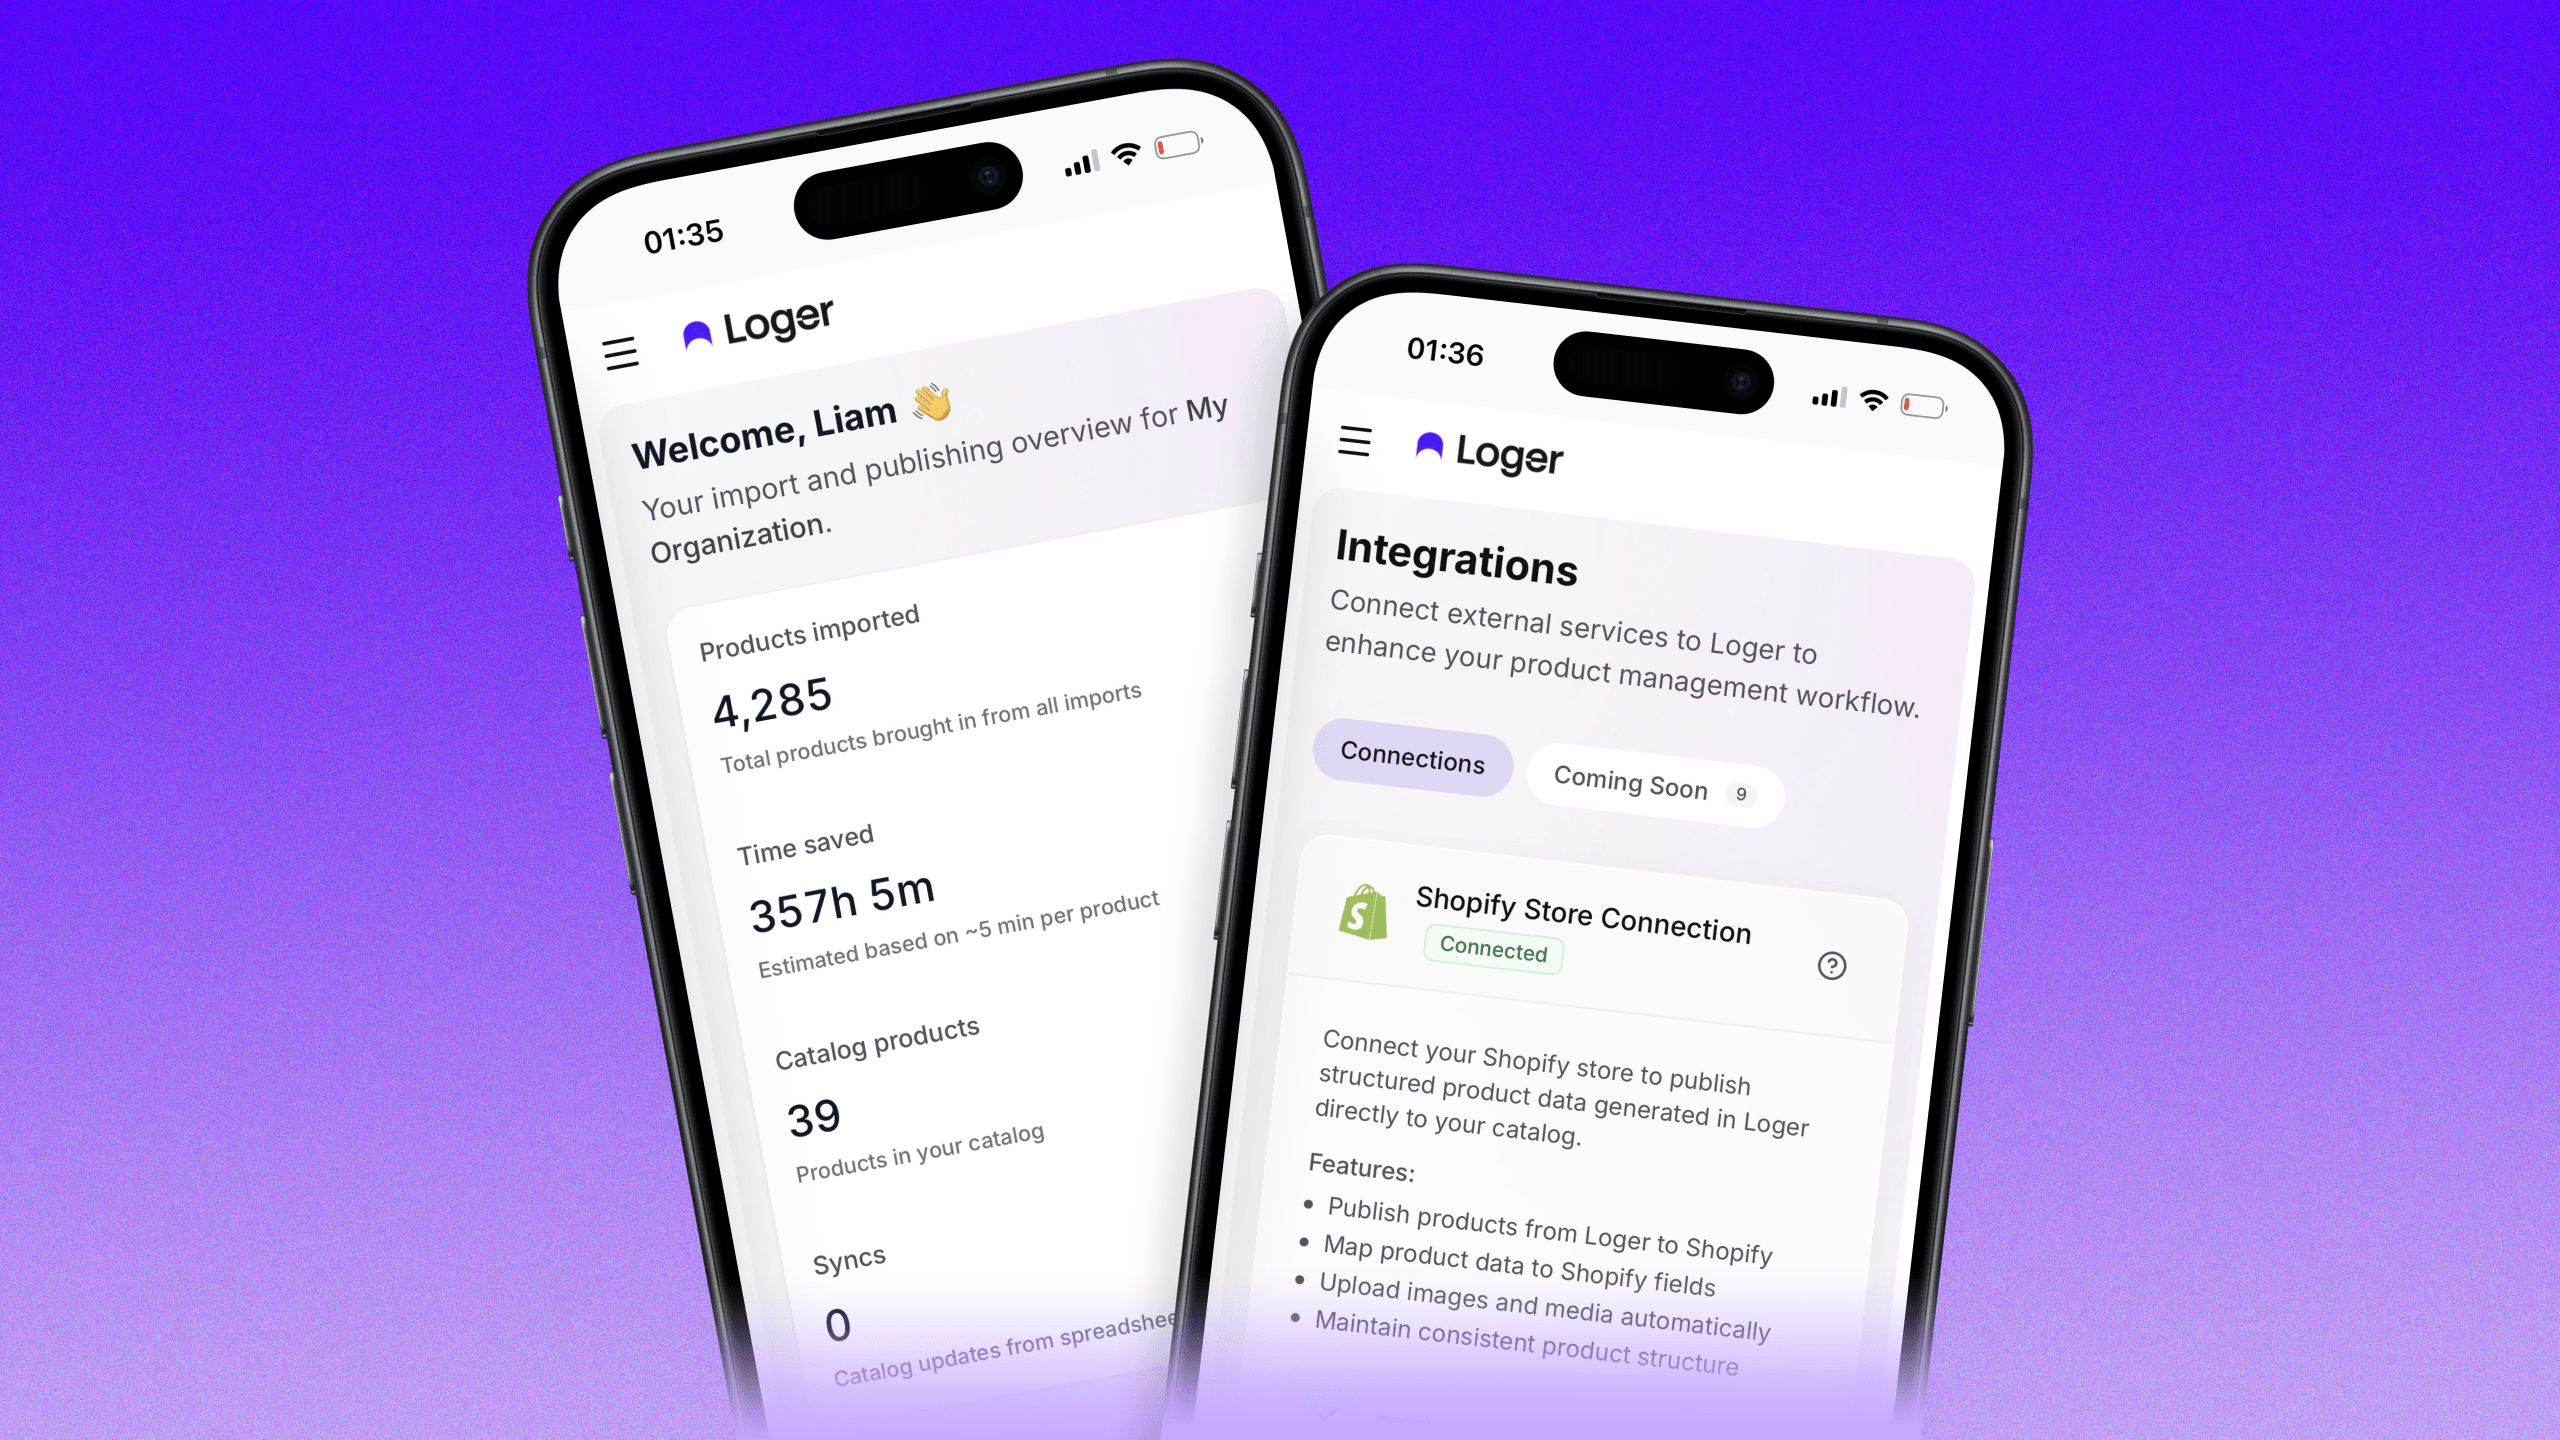
Home |
| High-level analytics: import and publish activity over time. |
Import |
| List of import sessions; jump into review or resume work. |
New import |
| Start a fresh import (Drive, CSV, or local folder—per plan). |
Schedule |
| Scheduled / calendar-based publish workflows (Growth+). |
Catalog |
| Persistent product catalog: search, filter, health, store links. |
Export |
| Download catalog as CSV, XLSX, JSON, or Shopify-oriented formats. |
Sync hub |
| Catalog sync (CSV diff), supplier watches, import-from-store, history. |
Integrations |
| Connect Shopify, WooCommerce, PrestaShop, BigCommerce, Squarespace, Wix, Google Drive. |
Team |
| Invites and roles (Growth+). |
Settings |
| Profile, brand voice, billing portal. |
Use the sidebar search if you forget where a workflow lives; it indexes these destinations by keyword.
Accounts, authentication, and onboarding
Email and password
New users can sign up with email. The product sends a short verification code (SMTP) to confirm the address before the account is fully usable. That reduces fake signups and keeps password recovery aligned with a real inbox.
Google Sign-In
You can authenticate with Google OAuth as an alternative to email/password. This is separate from (but related to) Google Drive: you may use Google for login even if you connect Drive later under Integrations.
Onboarding
New accounts typically go through a guided onboarding flow so you connect at least one data source or store and understand the import → review → publish sequence. Completing onboarding reduces confusion when the first large CSV arrives.
How to use: Finish onboarding once; you can always add integrations later from Integrations.
Subscription plans and what they unlock
Loger uses Stripe for subscriptions. Plans gate features server-side (not just hidden buttons), so limits are enforceable.
Plan | Role | Highlights (summary) |
|---|---|---|
Preview | Explore | UI exploration; no imports or store connections. |
Starter | Solo testing | Limited imports/month, capped products per import, one store, Drive + CSV, AI questions, manual catalog sync, basic export. |
Growth | Scaling merchants | Unlimited imports (per month cap is effectively unlimited), higher product caps, three stores, local folder import, catalog optimizer, automated supplier sync, platform-flavored exports, scheduled publish, team (multiple seats). |
Enterprise | Agencies / large catalogs | Very high SKU/month limits, larger local uploads, catalog rollback, more team seats, unlimited store connections and import sizing where configured. |
Exact numeric caps (products per import, images, SKUs per month, local upload MB/file count, team seats) live in the app’s plan configuration—check Billing for what your workspace currently has.
How to use: Upgrade when you hit a hard block (e.g. local folder import on Starter). Growth is the tier where optimizer, supplier watches, and team typically come online together.
Multi-source product import
Import is the front door. Loger accepts three families of sources:
1. Google Drive
What it does: After you OAuth-connect Google Drive under Integrations, Loger can scan My Drive and Shared with me folders recursively. It picks up spreadsheets (including multi-sheet workbooks) and images, then builds a structure snapshot that the AI and heuristics use to infer products, variants, and image associations.
How it works (conceptually): Files are listed and parsed; images can be matched to rows by filename, SKU, folder naming, or flat-folder strategies depending on what the scan discovers. Spreadsheets contribute tabular columns that may be mapped to title, SKU, price, options, etc.
How to use:
Go to Integrations and connect Google Drive with the requested scopes.
Open New import, choose Google Drive as the source, and select the folder the supplier shared (or your staging folder).
Optionally attach a spreadsheet from elsewhere in Drive if the images live in one folder but the “truth” table lives in another file—Loger supports that pattern.
Run the scan and wait for the session to move through states (scanning → products ready).
Open the session from Import to review and edit.
Plan note: Drive import is available on paid tiers that include googleDriveImport (Starter and above in the default configuration).
2. CSV upload
What it does: You upload a .csv file. The parser handles real-world mess: BOM stripping, encoding fallbacks, delimiter detection. Rows are mapped to products and variants using column detection and heuristics. If mapping fails badly (for example, almost no rows become products), the pipeline can trigger AI reconstruction from the CSV to build a synthetic structure similar to a Drive snapshot.
How to use:
New import → choose CSV.
Upload the supplier file.
If the preview looks wrong, use in-app tools (when available) for AI-assisted reconstruction or column fixes rather than hand-editing a 10 MB file externally.
Proceed to review like any other session.
Plan note: CSV is enabled on Starter+ in the default matrix.
3. Local folder
What it does: You upload a folder’s worth of files from your computer (images + optional spreadsheets). The scanner extracts product signals similarly to Drive, without needing files to live in the cloud first.
How to use: New import → Local folder → select files within plan limits (total megabytes and file count caps apply on Growth vs Enterprise).
Plan note: Local folder import is not on Starter in the default configuration—Growth and Enterprise include it.
Import sessions and the review experience
Sessions
Each import creates a session with a lifecycle (for example scanning, completed, products ready, published). The Import list shows your sessions so you can resume work, compare batches, or publish when ready.
Product type and context
At the start of an import you typically indicate what kind of products you are bringing in (or a custom “Other” category). That context nudges AI and validation toward sensible defaults (naming, attributes, option columns).
AI product analysis and follow-up questions
What it does: Loger uses an LLM (OpenAI) to interpret ambiguous structures: weird column headers, combined title/SKU cells, variant explosions, and image-heavy folders with minimal metadata. When confidence is low, the system can surface follow-up questions so you confirm mappings instead of silently guessing.
How to use: Answer questions in the import UI when prompted; they reduce downstream publish errors. After products exist, you can still refine fields manually.
Plan note: AI questions are available on Starter+ in the configured feature set; deeper catalog optimizer (bulk SEO rewrites) is Growth+.
Review grid, inline editing, and validation
What it does: The review interface shows each product with variants, images, pricing, vendor, and platform-specific considerations. Pre-publish validation runs rules (for example title and vendor required for Shopify-style flows, variant prices present, etc.) and surfaces errors vs warnings so you see a green/yellow/red style readiness picture per product.
How to use:
Click into a product to edit fields inline; changes persist for that session.
Fix errors before publishing; warnings are judgment calls (SEO thin content, missing images on some channels, etc.).
Use bulk actions where the UI offers them for repetitive fixes.
Publishing to ecommerce platforms (six integrations)
Loger can push structured products to Shopify, WooCommerce, PrestaShop, BigCommerce, Squarespace, and Wix Stores. Each integration has its own auth method and API quirks; the app normalizes your catalog model and maps to each platform’s product APIs.
Connecting stores
Where: Integrations — one card per platform.
Platform | Typical connection style |
|---|---|
Shopify | OAuth (install / authorize the app). |
WooCommerce | REST API key + secret from Woo. |
PrestaShop | Webservice API key (Basic auth). |
BigCommerce | API token + store hash. |
Squarespace | API key (Bearer). |
Wix | API key + Site ID for Stores. |
Credentials are stored with Row-Level Security in the database; disconnect revokes the app’s ability to call the store.
What “publish” means per platform
Defaults skew toward safety:
Many channels create products as drafts, inactive, or hidden listings so you can QA inside the store admin before going live.
Shopify supports publishing as draft or active depending on your choices in the product flow.
WooCommerce targets draft simple and variable products.
PrestaShop emphasizes combinations (variants) and stock with image upload.
BigCommerce uses inline variants on physical products, often as hidden until you reveal them.
Squarespace and Wix publish physical products with variants, with image strategies suited to each API (multipart vs URL-based).
How to use:
Connect the store under Integrations and verify status is healthy.
From an import session or catalog selection, open Publish.
Select which connected stores receive the batch (multi-platform publish is a core value—you are not forced to pick only one).
Confirm; monitor per-platform errors in the UI if any SKU or image fails validation on that channel.
Per-platform connection checklist (quick reference)
Use this when wiring each store for the first time. Exact button labels may vary slightly as the UI evolves; the Integrations page remains the source of truth.
Shopify
From Integrations, start Shopify connect.
You will OAuth into the correct shop; approve the app’s product scopes (
write_products/read_productsclass permissions as configured for the Loger app).Confirm the store appears as connected and run a tiny test publish (one SKU) as draft.
If you use import from store, pull a single product first to validate IDs and images.
WooCommerce
In WooCommerce admin, enable the REST API and create a key with read/write product access.
Paste consumer key and consumer secret into Loger’s WooCommerce card.
Confirm HTTPS on the store URL; mixed or outdated SSL breaks API calls.
Test with a variable product if you sell variants—Woo’s option model must map cleanly.
PrestaShop
Enable Webservice in PrestaShop and generate an API key with appropriate resource access for products, combinations, and images.
Enter the shop URL and key in Loger; Basic auth is handled server-side.
PrestaShop combinations map to Loger variants—verify stock and image association on a draft product.
BigCommerce
In BigCommerce API accounts, create credentials with Products scope (and related read scopes as required).
Provide access token and store hash (API path identifier) in Loger.
Variant-heavy SKUs: confirm inline variant publishing matches how you merchandise (size/color matrix).
Squarespace
Create a Commerce API key in Squarespace (Commerce Advanced / APIs area—follow current Squarespace docs for your plan).
Paste the Bearer key into Loger.
Image uploads use multipart flows—test a product with multiple images before bulk.
Wix Stores
In Wix API Keys / developer settings, issue a key with Stores permissions; obtain Site ID for the correct site.
Enter API key + Site ID in Loger.
Wix often ingests image URLs—ensure your image URLs are stable and publicly reachable where required.
Import from store (catalog pull)
What it does: The opposite direction of publish: pull existing listings from a connected store into Loger’s catalog so you can manage them centrally, run sync, or republish elsewhere.
Where: Sync hub → open Import from store (the sidebar search labels this “Import from store”). Flow: pick platform → pick store → fetch products → choose IDs to import → server upserts into catalog_products with correct platform ID columns.
How to use: Use this when Loger should become the system of record after you already have live listings—avoid duplicating work.
Persistent catalog management
Once products land in the catalog (from publish, import-to-catalog, or store pull), Catalog is your operational home.
Capabilities typically include:
Search and filters across titles, SKUs, vendors, and status.
Sorting for large lists.
Vendor breakdown to see concentration risk or map supplier → brand.
Health scoring and signals that highlight incomplete or weak listings.
Platform link status (e.g. whether a row is tied to Shopify or another channel) for troubleshooting sync and republish.
How to use: Treat Catalog as the canonical list. When something looks wrong in a store, find the row in Loger first, fix data, then re-push or rely on automated sync depending on your setup.
Catalog sync (manual CSV diff)
Problem it solves: Suppliers email a new spreadsheet with changed costs, MSRP, or stock. You should not manually hunt row-by-row in the admin UI.
What it does: You upload a CSV. Loger detects columns (with learning from past correction data where implemented), matches rows to existing catalog lines (by SKU, handle, title fallbacks), and builds a diff: proposed field-level changes. You preview the batch, then apply approved updates to catalog_products. After that, you can push updates to connected stores.
How to use:
Go to Sync → Catalog sync.
Upload the supplier’s new file (same logical keys as before—SKU strongly preferred).
Review the diff summary; discard or fix obvious mapping mistakes.
Apply.
Use push to propagate price/inventory/cost changes to storefronts that support those fields.
Plan note: Manual catalog sync is on Starter+ in the default configuration.
Enterprise: Catalog rollback restores from snapshots after a bad apply—critical for agencies managing many SKUs.
Automated supplier sync (Drive spreadsheet watches)
Problem it solves: The supplier does not email you—they edit a Google Sheet you share. You want Loger to notice without polling them.
What it does: You configure a watch on a Drive spreadsheet. A scheduled job (approximately every few hours in production) checks for changes, rebuilds a logical CSV view, diffs against the catalog, applies updates, and can push to connected stores automatically when your rules allow.
Where: Sync → Supplier watches.
How to use:
Ensure Google Drive is connected.
Create a watch pointing at the supplier sheet; map how Loger should interpret tabs and columns if prompted.
Start with a small SKU sample and verify diffs before trusting full automation.
Monitor History (sync hub) for applied batches and errors.
Plan note: Supplier sync / watches are Growth+ in the default feature matrix—not Starter.
Catalog optimizer and brand voice
Brand voice
What it does: Under Settings, you define tone, style, and guidelines (brand voice). The AI uses this when generating or rewriting listing content so output sounds like your store—not generic filler.
How to use: Write concise rules: vocabulary to avoid, sentence length, whether you say “we” or stay neutral, category-specific notes. Update when you rebrand.
Catalog optimizer
What it does: For selected products (or the whole catalog where supported), Loger runs SEO-oriented rewrites: titles, descriptions, meta tags, product types, etc., with before/after preview so you accept or discard changes.
How to use:
Ensure you are on a plan with catalog optimizer.
Configure brand voice first.
From catalog or optimizer entry points, run optimization on a small batch, review diffs, then scale up.
Plan note: Optimizer is Growth+; Starter may rely on manual edits plus AI questions during import only.
Scheduled publish
What it does: Instead of pushing immediately, you can queue publish jobs for a future date/time so campaigns align with launches, email blasts, or regional midnight rules.
Where: Schedule (/products/schedule) and publish flows that support scheduling.
Plan note: scheduledPublish is enabled for Growth and Enterprise in the configured plan features.
How to use: Pick eligible products or sessions, choose a future slot, and verify timezone interpretation before Black Friday week.
Export
What it does: Download your catalog for backup, finance, or feeding another system.
Formats supported in the export layer include:
CSV — flat tabular.
XLSX — Excel-friendly.
JSON — structured nested products + variants for developers.
Shopify-formatted CSV — for merchants who want a Shopify-native import file.
Where: Catalog → Export.
Plan note: Basic export is Starter+; platform-specific / extended export flavors may require Growth+ (catalogExportPlatforms).
Analytics dashboard
What it does: Home (/dashboard) aggregates import and publish activity over selectable ranges (such as 1d / 7d / 30d / all time depending on UI), plus lifetime-style counters. It answers: “Are we importing more than we publish?” “Did last week’s spike repeat?”
How to use: Check after large supplier drops; if imports climb but publishes flat, you have a review bottleneck—not a tooling problem.
Team management
What it does: Organizations with members and invites. Roles such as Owner, Admin, Member, Viewer control who can connect stores, run destructive sync applies, or only read catalog data.
Where: Team.
How to use:
Owners/Admins handle billing and integrations.
Members run day-to-day imports.
Viewers audit or support without changing credentials.
Plan note: Team management is Growth+; Starter is typically a single seat.
Billing and self-service
What it does: Stripe Checkout (payment links) provisions plans; the customer portal lets users update cards, cancel, or swap intervals where enabled. Webhooks keep subscription state in sync with feature gates.
Where: Settings → Billing.
How to use: Always keep a valid payment method before a large import weekend; plan downgrades may remove supplier watches or optimizer mid-cycle depending on policy—read in-app messaging when changing plans.
Account settings, profile, and brand assets
Account (/settings): Update display name, email change flows (verification codes via SMTP), password updates, and similar identity fields tied to Supabase Auth.
Profile / avatar: Avatar images upload to Supabase Storage with access rules tied to your user—use a clear headshot or logo for teams so invites recognize the right collaborator.
Brand voice: Documented above under optimizer; it lives in Settings so merchandising and AI stay aligned.
Changelog: The app may surface a changelog modal when product updates ship—use it to learn new sync, import, or integration behavior without re-reading docs.
Behind the scenes (helpful context, not required reading)
These details explain why the product behaves the way it does:
Session state machine: Imports progress through tracked states so the UI can resume after long scans or AI passes instead of starting from zero.
Server-side gating: Plan checks run on the server (
gate-style enforcement) so API routes cannot be “unlocked” by tweaking the browser.Shopify mandatory webhooks: Shopify integrations participate in compliance webhooks (data privacy / shop lifecycle) as required by the platform; your store stays in good standing when the app is installed correctly.
Supplier sync cadence: Automated watches rely on scheduled jobs (cron) in production—edits in a supplier sheet propagate on the next successful run, not necessarily the second you save. Plan minutes or hours of delay for operational safety and API rate limits.
Multi-platform publish orchestration: Pushes run per platform with isolated error handling so one failing channel does not silently block others; always read per-platform error messages when a batch is partial.
Safety, validation, and operational best practices
Start with drafts on each channel until image order, variant naming, and tax/shipping settings are verified.
SKU discipline is the backbone of sync; inconsistent SKUs break matching and create duplicates.
Run small batches the first time you connect a new supplier and a new platform together.
Use History in the sync hub to audit what changed after automated runs.
Enterprise rollback exists because humans still email the wrong file sometimes—know whether your plan includes it before a risky apply.
Closing summary
Loger is not “just an importer.” It is a loop:
Import (Drive / CSV / local) → AI structure & questions → Review + validation → Optimize (Growth+) → Publish to one or six platforms → Manage in Catalog → Sync (manual diff or Drive watches) → Export or pull from stores again as the business evolves.
Use this article as a reference spine. When you adopt a new feature, read the matching section, click through the listed route once, and run a ten-product dry run before you trust it with your full assortment. That is how teams get the SEO, operational, and multi-channel benefits without surprises in production.